Many people will advise you not to get into imaging until you've done some visual work beforehand, so that you know what you are looking at, and don't build unreasonable expectations about what you're going to get out of the camera. While the camera does see much that your eye can't (because your retina simply isn't an emulsion), you may be somewhat disappointed if you're hoping to take coffee table book pictures. Certainly if you're expecting to do that with the C5+.
That said, imaging is a lot of fun. It can also be frustrating. So far, I've only taken a few pictures with my camera (an old Canon FT, and the old completely manual kind are often the best), but I did build a makeshift color CCD from a QuickCam, as so many others have done. By and large I followed the instructions from the June 1998 issue of Sky and Telescope (p. 120), but with a color QuickCam instead of a greyscale one.
There is just one additional issue one has to deal with when using the color QuickCam. The board has a lot more stuff on it. On the greyscale QC, the CCD chip is the only thing on its side of the board; on the color QC, both sides are packed with electronics. So where the plans call for digging a small hole for the CCD in the lid of a can of shaving cream, I took the shaving cream lid and cut the entire top off. Then I placed the board over the top, and taped it in place with electrical tape. It's not pretty, but it works.
One more thing that I'd like to do is to cool the camera. I used to work for an electronics firm, and they had these aerosol cans of coolant (like Freon). You'd spray the circuit board with this stuff, and it would frost over (it would cool things down to about –40 degrees), and then you would run the circuit and see which parts got hot and melted the frost. Anyway, I figure that this might do to get a darker black frame, and minimize noise and all that. Unfortunately, the Freon is packed away, so it'll have to wait until I go unpack it at Christmas time.
Update: I wasn't able to locate the Freon can, so I went to a Radio Shack (local electronics hobby store) and bought a can of "environmentally conscientious" component coolant. It does appear to eliminate some of the thermal noise, but the real test will come when I take this out into the field.
Obviously, there are better cameras than the QC for astronomical uses, but someone donated their QC, so this one was essentially free. If you've looked at my observing log, you may have seen some of the pictures that I took then; those were my first and were taken through an unmodified QC through the eyepiece. Here are some that were taken through the modified QC at prime focus.
In 1998, I assembled a fully portable set-up for using the QuickCam. Previously, my only available laptop was my nine-pound Gateway 2000. Not only was it kind of heavy to lug home just to take a few pictures, it was also generally supposed to remain connected to the network at work. So I would really have preferred to use my little Toshiba Libretto.
The problem was that my Libretto doesn't come with a PS/2 or AT port. I believe the new ones come with one (on a port expansion dock), but mine doesn't. And the QuickCam plugs into both the parallel (printer) port and the PS/2 port. Now, all the data actually goes back and forth on the parallel port; the keyboard port is used solely for power (5 volts). So my objective was to power it directly; then I could use my Libretto to take the pictures, and it would be a heck of a lot more convenient.
This turned out to be rather simple. Here's what I needed:
My QuickCam came with two keyboard plugs, one for a PS/2 port and one for an AT port. The two are connected by a wire. I cut this wire roughly in the middle, exposing four wires: black, red, brown, and orange. Strip the black and orange wires, and hide the other two. <grin> Then put a male Quick-Connect on the exposed black wire, and a female one on the orange wire.
Now put a female Quick-Connect on the black wire on the battery case, and a male one on the red wire on the battery case. To use the QuickCam, slide the batteries into the battery case, and connect male to female between the battery case and the QuickCam wiring. Connect the remaining plug to the parallel port on your computer, and you're off and running.
Now this is really only for your curiosity's sake, because there are only a few of you out there who will be using a QuickCam for astronomical purposes, and have a computer you want to use that lacks both a PS/2 and an AT port. But I thought it might be interesting to lay it out.
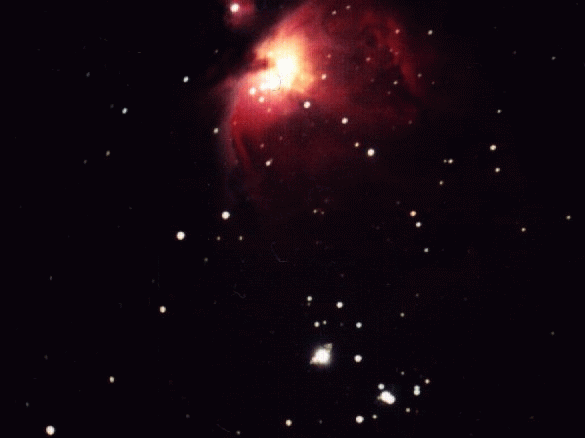
Chris Carlisle took this picture of the Orion Nebula, M42, with a f/6.3 focal reducer on the C5+. This was a 30 minute exposure on Kodak Max 800 film.
Copyright (c) 1998, 1999, 2000 Brian Tung