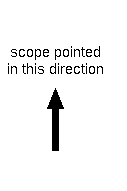
First, I'll assume that you typically observe with a star diagonal. Leave it in. Do not confuse collimation with the star test, which is best run without the star diagonal. Have the diagonal point up and away from the focusing knob. (This is for the C5+, whose focusing knob is in this position. For many other SCTs, the focusing knob should be directly right of the diagonal, so align the diagonal accordingly.) Throughout this procedure, look through the eyepiece with the telescope directly in front of you, rather than to the side. Use an eyepiece with about a 10 mm focal length. (In general, use an eyepiece with a focal length in mm about equal to the focal ratio of your scope.)
As in the star test, find a star of about second magnitude. Polaris is a good star to use which is visible year-round in the northern hemisphere. Southern hemisphere users can use alpha Pavonis, which is visible most of the year and can be found at (J2000) RA 306.412, Dec –56.735 (RA 20h 25m 39s, Dec –56d 44m 6s).
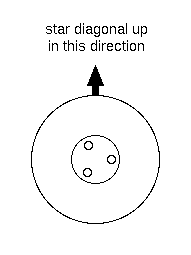
For coarse collimation, center the star and rack it out of focus in either direction until the blur fills up about 1/10 of the field of view (by diameter). You should be able to see the shadow of the secondary as a dark spot somewhere toward the center of the blur.
If it is not in the center, you will need to center it by using a Phillips head screwdriver to adjust the secondary alignment. Suppose that the shadow of the secondary is leaning toward the 3 o'clock position, as shown above. Now come around to the front of the telescope. Using the up direction of the diagonal as 12 o'clock, find the secondary screw that comes closest to either 3 o'clock or 9 o'clock. If the screw is in the 3 o'clock direction, turn the screw clockwise; if the screw is in the 9 o'clock direction, turn it counter-clockwise. In short, turning a screw clockwise pushes the disc away from the screw's clock position; turning it counter-clockwise pulls the disc toward the screw's clock position. If your screws are placed as shown below, you should turn the rightmost screw clockwise.
Use small turns--at most about 1/10 of a turn. Repeat this step until the shadow is centered in the blur, as shown below. Remember to center the star after each adjustment.
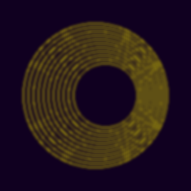
For fine collimation, focus the star as tightly as you can. You should see the star as a very small disc, surrounded by a thin halo. This is the Airy disc, surrounded by the first diffraction ring. Now, rack the star out enough to see about three diffraction rings. The disc will shrink until it is barely visible somewhere near the center of this "bullseye" pattern (see below).
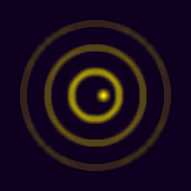
Using the same procedure that you used to center the shadow of the secondary, center the disc, so that it looks something like the image below. Again, remember to center the star after each adjustment.
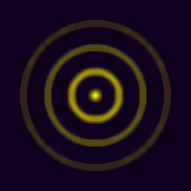
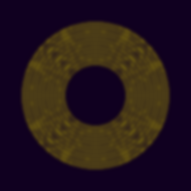
Then rack the star toward focus so that only two diffraction rings are visible. Somewhat surprisingly, this pulls the disc out and emphasizes its misalignment. Again, turn the screws until the disc is centered. At this point, your screw turns should be extremely small, probably only a couple of degrees, just the slightest give on your screwdriver.